A jungle theme was decided on based on a lion that I saw on Pinterest with a ribbon mane. But after adding up the cost of all the different ribbons that I would need to created the mane...I decided that I needed to find a new solution. So wandering through the craft store looking for anything that would work for a mane, I found these...

fabric loops usually used to weave pot holders {remember making those as a kid? I do}. They work perfect...they stretch and don't unravel...and cost around $3.00 for A LOT more loops than I actually needed {it looks like there is more pot holder making in my future}.
So here's how to make your own quiet book page...
Gather:
1 rectangle of felt {for the background} cut to 8.5 x 11 inches
Golden yellow felt circle measuring about 5 3/4 inches {diameter}
Colorful fabric loops
Triangle of brown felt for nose
Yellow felt ears {what ever size/shape you like}
Embroidery floss and needle
Sewing machine and thread
Fabric marker {water-soluble or disappearing ink}
Scissors
Pins
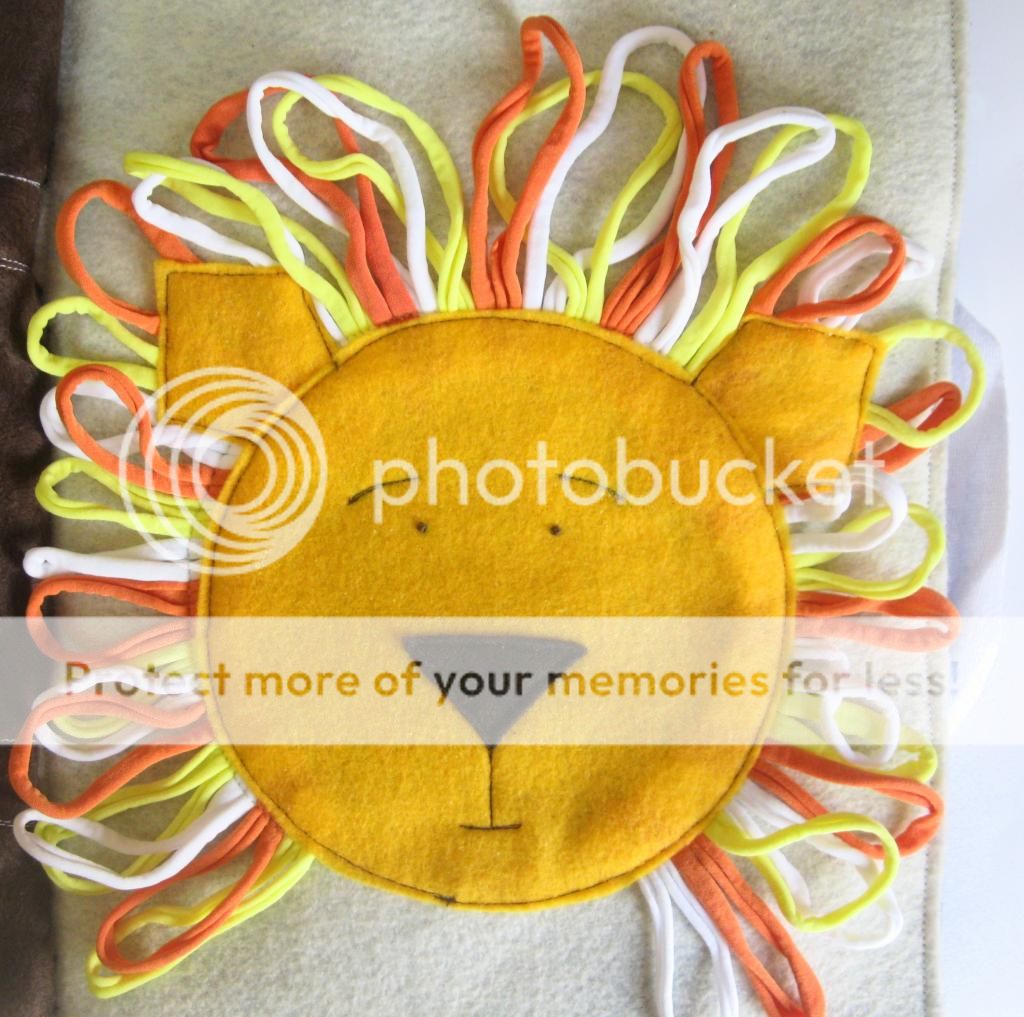
1. Start by laying out your background piece of felt. Decide where you want your lion head to be. You will want it slightly off center towards the bottom of the page to allow room for the mane. Using a fabric marker draw a 5 inch circle.
2. Start arranging the loops along the drawn line. If you want the neck to be open start near the bottom of the circle, if not you can start anywhere you like. Using your sewing machine, stitch along the line, securing the loops. It's easiest if you arrange the loops a few at a time, then stitch them on. Repeat until you have a complete mane.
3. Sew another line of stitching inside of your first circle to add extra strength. Trim the ends of the loops INSIDE the stitched circle, if you like {they will be covered by your lion's head}.
 4. Place the ears over the mane and top-stitch each. Try to stay close to the edge, and be sure to back-stitch.
5. Now for the face. Using the fabric marker, draw the features {eyes, eyebrows, mouth & out-line your nose}. You can hand stitch or machine stitch, which ever is easiest for you. I machine stitched the eyebrows and mouth and hand-stitched French knots for the eyes. After the eyes and mouth are stitched on, top stitch the felt nose on using the sewing machine
6. Place the lion's face over the edges of the mane and ears. Pin in place. Using your machine, top stitch close to the edge, completely around the full circle.
And page 1 is done! Easy, right? :)
Pages 2-6 coming soon & a binding tutorial to finish it off.
Page 5: Tropical Fish
Page 6: Coconut Trees

No comments:
Post a Comment