Showing posts with label recipe. Show all posts

5.23.2014

Broiled Grapefruit

After years of not eating it at all (really since childhood), I have recently fell in love with grapefruit, specifically broiled grapefruit.  It's sweet and tart and oh, so good. But, I despise eating it right out of the rind.  Drives me crazy.  So here is my solution...it's pretty and although it takes a little prep, it is so simple to pull together.

Preheat your broiler, then get started.
First, slice of the top and bottom of you grapefruit.  Just enough to expose the fruit and give you some stabilization.

Next, working your way around the fruit cut off just the peel & pith.  Start and the top and follow the curve of the grapefruit around to the bottom.  Try to take as little of the fruit as possible.  The first slice is always a little bit of guess work, after that you can see how deep you need to cut.  You may need to flip the grapefruit over and trim up the bottom.  Don't leave any pith behind.


It should look something like this.

Now hold the grapefruit in the palm of your hand.  You may want to switch to a paring knife for this part.  Cut on both sides of each membrane to release the fruit.  Try to cut as close to the membrane as possible.  Be careful!  Then drop your grapefruit segments into a small ramekin. 


This is all you should have left.  Make sure you remove any seeds you come across too.

Sprinkle the top with a spoonful of sugar, as much as you would like, depending on the sweetness of your grapefruit.  Put under the preheated broiler & cook until bubbly and browned.  I usually place mine further away from the heating element, only because I am likely to be distracted by little kids and such.  The closer to the heating element the faster it will cook--keep an eye on it! 

When it's ready, let it cool slightly & enjoy!


5.08.2014

Cinnamon Walnut Apples


These apples are so, so yummy.  They go great with breakfast (or breakfast-for-dinner which we do a lot) or along side pork tenderloin.  The tip is to not let them cook too long...we don't want applesauce here. 

Cinnamon Walnut Apples

4-5 large apples, preferably apples that hold up well when cooked...but whatever you have on hand will work too
2 TB butter
3 TB brown sugar
1 tsp. cinnamon
handful of chopped walnuts

1. Peel and core apples, cut each into 8 wedges.

2. Heat butter in a 10-inch skillet, until it just starts to brown.  Add apples--CAREFULLY!! cold, wet apples are likely to splatter in the hot butter. Saute apples, turning occasionally until they start to brown & caramelize on all sides.  

3.  Add the walnuts, cook stirring often until walnuts are fragrant, just a minute or two.  Sprinkle with brown sugar and cinnamon, tossing to coat completely.  Cook a few more minutes, just until apples are crisp tender.  Remove from heat & enjoy!


4.16.2014

Banana Cream Pie

My version of banana cream pie is inspired by my husbands version...he uses a pre-made graham cracker crust & cool whip.  I don't.  It's good both ways, but here is my version...

Banana Cream Pie
Serves 8

1 recipe for your favorite single crust pie crust (I use this one), blind baked & completely cooled
1 small box banana pudding mix
2 cups cold milk
2 cups heavy whipping cream
1/4 powdered sugar (more or less to taste)
2 bananas

1. Add whipping cream to a large bowl.  Beat on high speed until stiff peaks form.  Measure out 1 cup of the unsweetened whipped cream and set aside.  Add the powdered sugar to the remaining whipped cream and beat to combine--careful to not over-whip...or you will end up with sweet butter.

2. In another large mixing bowl, whisk together banana pudding mix and milk until thickened.  Fold in the 1 cup unsweetened whipped cream.  Combine thoroughly.

3. Slice your bananas and arrange a single layer along the bottom of the cooled pie crust, be sure to save some of the bananas for the top.  Carefully spoon the pudding mixture evenly over top of the bananas.

4.  Transfer the sweetened whipped cream to a pastry bag fitted with a decorative tip (I used a large star tip) & decorate to your heart's content...or just carefully smooth the whipped cream over the pudding layer.  Garnish with the reserved banana pieces.  Chill until completely set & enjoy!


4.09.2014

The Best Way To Eat Asparagus....in my opinion

Not much makes me more happy then when spring rolls around and the produce section is full of spring goodness.  Especially the asparagus. Yum. Oh, and the strawberries that actually taste like strawberries...more on that another day though.

Here is my all time favorite way to cook asparagus. It's quick. It's easy. It's so, so good.

Roasted Asparagus with Lemon
Oven: 350  Time: 30 minutes max

1 bunch asparagus, rinsed
Zest of 1/2 lemon
juice of 1/2 a lemon
salt
pepper
olive oil

1.  Preheat your oven to 350.  Snap the ends off the asparagus by pinching each end and bending gently, it will break where it needs to.  Set aside the bottom pieces, either to compost, make into stock or toss.

2. Arrange asparagus in a 8x8-inch baking dish.  Drizzle lightly with olive oil.  Sprinkle with salt and pepper to taste.  Sprinkle with lemon zest.  Toss to combine.

3. Put into a preheated oven and cook until crisp-tender, about 15 minutes.  This will depend on the thickness of your asparagus, the thinner the asparagus, the less time it will take to cook.  Just keep an eye on it.

4.  When asparagus is done remove from the oven, squeeze lemon juice over all and toss to coat.  Enjoy!

**This is equally yummy (if not more so) on the grill.  Follow instructions above, just place asparagus spears onto a preheated grill, turning every so often until done, instead of using the oven.


9.25.2013

Sweet and Sour Chicken {from scratch}

Sweet & Sour Chicken is perfect for nights when you need a quick and easy dinner.  Don't expect the typical take-out or from the jar bright red sauce, but this one tastes just as good {if not better...I would go with better}.


Feel free to substitute pork or shrimp for the chicken or change up the veggies according to your taste.  This recipe comes from one that my mom made many times when we were growing up, I always loved it...I'm sure you will too.


Sweet & Sour Chicken
serves: 6-8

1 tablespoon oil
2 boneless, skinless chicken breasts, cut into cubes
2 green peppers, chopped (or colored peppers, I happened to use red this time)
1 cup diced carrots
1 small onion, chopped
2 cloves garlic, minced
1 can pineapple chunks (in JUICE)
Cooked rice

for sauce:
1 1/2 cups sugar
6 Tablespoons corn starch
1/2 cup soy sauce
2/3 cup vinegar
1 1/3 cup pineapple juice reserved from pineapple chunks (or water)
4 Tablespoons ketchup

1. In a large saute pan heat oil over medium high heat, add chicken and cook until browned no longer pink.  Add peppers, carrots, onions, and garlic.  Cook until vegetables are crisp-tender.

2. Meanwhile, in a medium sauce pan, whisk together sugar and cornstarch.  When combined, whisk in soy sauce, vinegar, pineapple juice and ketchup until smooth.  Place sauce pan over medium high heat, and heat until boiling, stirring occasionally.  The sauce with thicken up quickly as it begins to boil.  When it is thickened (but still pour-able) remove from heat.

3. Add as much sauce as you like to your chicken and vegetable mixture, add pineapple chunks and stir until all is coated.  Serve over rice.

**This makes quite a bit of sweet and sour sauce, I always have some left over.  Save it in the fridge for about 2 weeks, it makes a great dipping sauce**

9.10.2013

Chili

{this night we had our chili atop cornbread waffles...so, so good}

Chili is a fall time favorite in our home, one of our go-to comfort food recipes.  Here's how I make it...

Chili
serves: 6-8

2 tablespoons olive oil
1 medium onion, diced
1 green pepper, diced
3 stalks celery, finely diced
3 cloves garlic, minced
1 pound ground beef
1 tablespoon chili powder (plus more to taste if needed)
1 teaspoon dried basil
1 teaspoon salt
1 teaspoon pepper
1 teaspoon Montreal steak seasoning
1/4 teaspoon red pepper flakes (or more to taste)
1- 6 oz can tomato paste
1- 14.5 oz can diced tomatoes (plain)
1- 15.5 oz can dark red kidney beans, drained and rinsed
1- 14.5 oz can low sodium chicken broth (beef or vegetable works too-whatever you have on hand)

1.  Heat oil in a large pot over medium high heat.  Add onions, green pepper, celery, and garlic.  Saute until vegetables are tender.

2.  Add ground beef.  Before meat browns, add the seasonings: chili powder, basil, salt, pepper, steak seasoning, and red pepper flakes.  Stir to combine, breaking up beef and cooking until beef is no longer pink.  If desired you can transfer this to a crock pot, then proceed with the next steps.

3.  Add tomato paste, stir to combine.  Stir in diced tomatoes, kidney beans and broth.  Simmer over low heat, stirring occasionally, for at least an hour to allow the flavors meld (at least 3-4 hours in a crock pot).

4.  Taste, adjust seasonings as desired.  I find that sometimes the heat of the chili powder cooks out during a long cooking time, and you might like it spicier, this recipe is on the mild side.  If you do add more seasoning, cook for a few more minutes, then enjoy!

8.31.2013

Strawberries & Cream Crepes


The kids {my daughter especially} has been wanting crepes for a very long time.  So, when this Saturday rolled around and we had no where to go, and not much to do, I decided it was the perfect opportunity for an extra special breakfast treat.  They were a big hit {really, how could they not be?}. Here's how you can make your own.

Strawberries & Cream Crepes
Makes: about 15         Total time: 30 minutes

You will need:

{for strawberry topping & filling}
2 cups frozen strawberries
2 tablespoons granulated sugar (or to taste)
2 tablespoons water
1 teaspoon vanilla
1 pint heavy whipping cream
2-4 tablespoons powdered sugar (or to taste)

{for the crepes}
2 eggs
1 1/2 cups milk
1 cup flour
1/4 teaspoon salt
1 tablespoon oil
butter for pan


1.  Start with your strawberries.  In a medium sauce pan over medium high heat, combine frozen strawberries, granulated sugar, and water.  Heat to a boil, stirring occasionally.

2.  Cook strawberries until thickened, but still syrupy and remove from the heat.  Stir in vanilla.

3.  Using a immersion blender (or regular blender) puree until just smooth.  Set aside to cool.  Transfer 2/3 cup of the strawberry mixture to a bowl & chill (these will be added to your whipped cream later)

4.  To start your crepes, beat together the eggs and milk.  Add remaining crepe ingredients and whisk until smooth.  I like to use the immersion blender for this too, you don't want any lumps.

5.  Heat a small skillet or crepe pan of medium heat.  When warm, remove from heat and brush lightly with butter. Pour a scant 1/4 cup of crepe batter into pan and immediately swirl around to coat the entire bottom of the pan.

6.  Return pan to heat and cook crepe until it is set on the top and bottom is slightly browned.  To remove crepe, run a rubber spatula around the edges of the crepe and slide onto a plate.

7.  Repeat steps 5 and 6 with remaining crepe batter.

8.  Next combine the whipping cream with the powdered sugar and beat until stiff peaks form.

9.  Gently fold reserved 2/3 cups strawberry sauce to whipped cream.

10.  To assemble, lay one crepe out on a plate.  Spoon 2 tablespoons (or so) of the strawberry whipped cream mixture into the center of the crepe.  Fold sides over filling to create a roll.  Top with some of the remaining strawberry sauce and enjoy!

Crepe batter recipe adapted from Better Homes and Gardens New Cookbook

8.28.2013

Raspberry Orange Muffins

You can't go wrong with muffins.  In our home they are always greeted with cheers and quick requests to "eat one now".  I've started making them in big batches {this recipe is easily doubled} and freezing them so anyone can grab one for a snack, toss on into their lunch box, or eat as a quick breakfast as we run out the door.  To freeze, simply wrap each muffin individually in plastic wrap, then store in a labeled freezer bag.  When you are ready to eat, just unwrap and pop into the microwave for a few seconds til warm.


Raspberry Orange Muffins
Total time:40 minutes        oven: 350         makes:18-24
These muffins are a perfect combination of sweet and tart, with a fantastic crunch from a oatmeal crumble topping. They are adapted from a muffin base recipe of my great-grandmother's...so you can't go wrong.

Here's what you need:

1/2 cup shortening
1 cup granulated sugar
1/2 cup packed brown sugar
2 eggs
1 teaspoon vanilla
1/4 teaspoon baking powder
3/4 teaspoon baking soda
3/4 teaspoon salt
2 cups flour, divided
1/4 cup milk
1 1/2 cups raspberries (fresh or frozen) dusted in about 1 tablespoon flour
zest of one orange (about a tablespoon)

{for crumble topping}
1/4 cup butter, melted
1 cup rolled oats
1/2 cup granulated sugar
1/2 cup packed brown sugar
1/2 teaspoon cinnamon


1. In the bowl of a mixer, cream together shortening and sugars.  Mix in eggs, vanilla, baking powder, baking soda and salt.
2. Add one cup of the flour, mixing until combined.  Mix in the milk, then add the remaining cup of flour.  Mix until just combined.
3. Add the orange zest and flour dusted raspberries, mixing by hand until well distributed.
4. Divide into paper lined muffin tins, set aside.
5. For topping, combine the melted butter, oats, sugars and cinnamon in a small bowl.  Stir with a fork until well combined.  Sprinkle evenly over
each muffin top.
6. Bake at 350 degrees, for 15-20 minutes or until tested done.  Cool completely and enjoy!

12.10.2012

Homemade Mints

These mints always bring back memories, my mom used to make them when we were kids, and honestly, I was always wowed...little did I know how crazy easy they are to make {and inexpensive too...you probably have everything you need already on hand}.  So if you are looking for an easy gift, try these...

You will need:
1 stick butter, softened {and to be honest, margarine works just fine here too}
1 pound powdered sugar {confectioners sugar}
2 tablespoons evaporated milk
1/4 teaspoon {or so} peppermint extract, to taste...or try any other flavor you like.
Additional Powdered sugar...if needed
Food coloring {optional}


1. Combine the butter, sugar and evaporated milk in a large mixing bowl.  Beat with an electric mixer {I use my Kitchen Aid with paddle attachment}, until the mixture comes together and forms a "dough."


2.  Remove from mixer, divide dough {if you want more than one color}.  Add a few drops of food coloring, gel always works best, and knead in until evenly colored.  If the dough is a little too sticky, go ahead and add a little more {just a little} powdered sugar.

3. Using a teaspoon, scoop out some of the dough.  I like to do this assembly line style...I scoop a bunch...then move onto the next step.

4.  Roll each scoop of dough into a ball.  It doesn't have to be perfectly round.  Basically you are looking for smooth edges.  Place each on a paper towel.

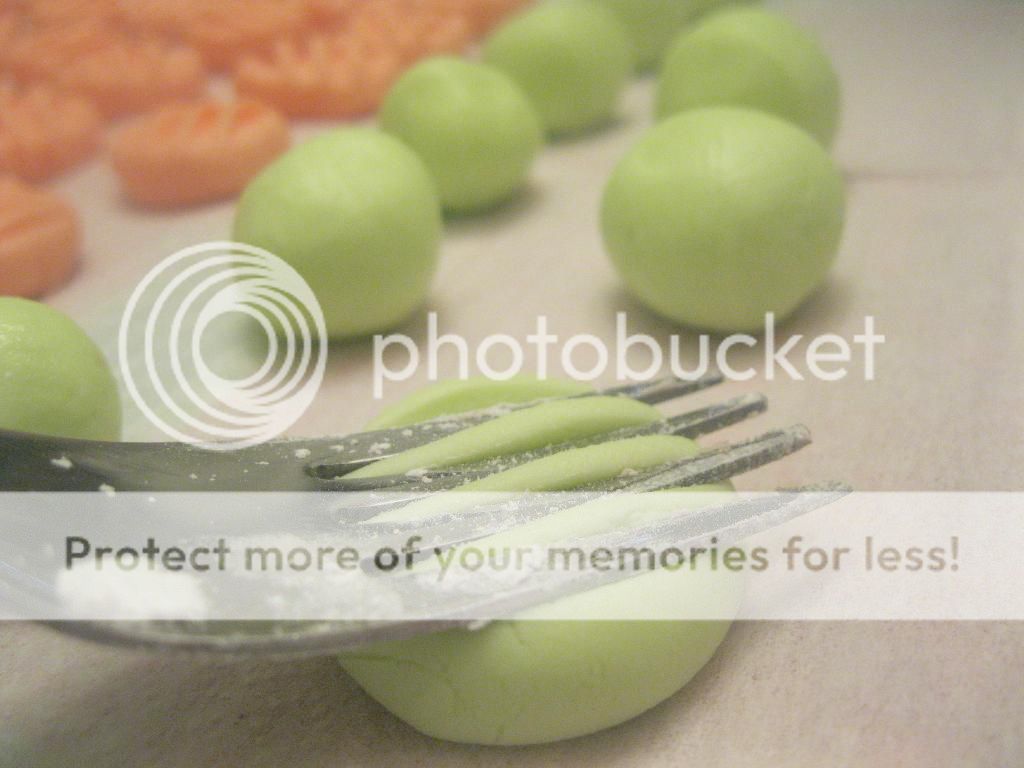
5. Using the tines of a fork, mash each ball into a disk. If  you find your fork sticking a lot, let them dry out for a minute or two.  Also, you can always dip the tines of the fork into powdered sugar to keep from sticking.

6. Lightly cover your candies with another layer of paper towel, and allow to dry overnight or up to 24 hours.  

I like to package mine wrapped in waxed paper and tied with string.  Your friends will love you :)