Showing posts with label quiet book. Show all posts

12.03.2014

Quiet Book, page 4 {bugs on leaves}

Do you ever feel like a year has gotten away from you? That's how my year has been...busy, busy, busy {I guess that's what I should expect with 5 kids...right?} and it has FLOWN by.  In all that craziness I completely forgot about pages 4, 5 & 6....oops! So here is page 4 of my quiet book for you "bugs on leaves".  It's another quick and easy design (the best kind).  It's more of a look, touch & feel page.  Younger kids will like the sensory aspect of just the different textures of the felt leaves and pompom bugs.  As they get a little older they can begin to count the bugs, name the colors, or match the colored bugs (try connecting them by drawing a line with a piece of yarn or string).

Here's what you need:
1 piece of felt for the background, cut to 8 1/2 x 11 inches, I used bright blue
Green felt in two shades
1/2 inch colorful pompoms, I chose more "autumn colored" pompoms
Sewing machine + thread
Embroidery floss + needle
Scissors

1. Cut out your leaves.  I know I say this a lot, but just free-hand it--you can do it!.  If it makes it easier, cut out a paper template first.  Make a large (about 9 x 5 inches) "football"...pointed oval shape, then just cut some notches out of the side to give it a more tropical leaf feel.

2. Arrange the leaves on the background, then pin in place.  Using a sewing machine, stitch the leaves onto the background, adding details for the leaf veins as you like (see pictures).


3. Arrange & hand stitch your pompoms in place using the embroidery floss.  Just knot your thread and sew through the background/leaves, into the pompoms and back down a few times to make sure they are extra secure.  Your stitching shouldn't show too much through the fluffy pompoms.  Add a few straight stitches around each bug's body for legs (see picture below). Repeat with remaining pompoms.  I added 5 pompoms to each leaf, one of each color.

And that's it.  Super quick and easy.  Enjoy!


**************
Page 1: Lion
Page 2: Snakes
Page 5: Tropical Fish {coming soon!}
Page 6: Coconut Tree {coming soon!}


5.01.2014

Quiet Book, Page 3 {hidden flowers}

This is long, long overdue, but here is page three of my felt quiet book that I made for my now 2 1/2 year old.   Ollie still loves it & plays with it often.  Remember pages one & two?  This one is just as easy, but a has a little more detail work. This page will focus on counting & colors for the "older" kids and a is fun peak-a-boo game for toddlers.


You will need:

1- 8.5 x 11 inch rectangle of felt {for the background, I used gray}
green felt
colorful felt scraps for flowers
embroidery floss
sewing machine & colorful thread

1. Cut out 3 bushes and 3 tufts of grass out of green felt.  Either free hand the design, or make a simple pattern out of paper before you cut your felt {see pictures for ideas}.

2. Arrange your bushes and tufts of grass on the background felt rectangle.  Pin in place.

3.  Using your sewing machine, stitch each on.  Be sure to leave the bushes free at the top so that they can fold down to reveal the flowers.  I stitched all the way across the page twice along the bottom of each bush.  Then across the page and along the bottom of each tuft of grass and then again across the page and along the tops of the tufts of grass {see pictures for details}.  Be sure that you stitch UNDER the bushes so that they remain free.
4. Next cut out your flowers from the scraps of colorful felt.  I just cut out circles and notched them to look like petals. You will need 6 flowers. {flower centers are attached later on}

5.  Arrange the flowers; 1 behind the top bush, 2 behind the middle, 3 behind the bottom bush.  Pin in place.  Using a fabric marker, mark where you would like the stems and leaves stitched (or just free hand).  Using the machine stitch the flower stem and leaves, then stitch on the flower.  Repeat with  the remaining flowers.  I stitched them on by just sewing across them a few times, or around them in a decorative way.  You can do this however you like, or even hand stitch them on if you prefer.

6. Attach any flower centers with a few french knots, repeat with the remaining flowers. Now you're ready to add this page to your quiet book...more on that later.

Page 5: Tropical Fish {coming soon}
Page 6: Coconut Trees {coming soon}


2.12.2013

Quiet Book, Page 2 {Snakes}

So, the last few weeks have been filled with kids with colds,  me catching the flu and snow-days {which are rare when you live in the mid-Atlantic region}...and trying to get the house back into some semblance of order {we're almost there}.  Needless to say,  I didn't have much time to blog...but I'm back now & here is page 2 of our quiet book...

This "snakes" page is the most quick and easy of all the pages I put together, but has lots of value.  Use it to learn colors and patterns or to practice counting {with small children, use adult supervision, we don't want anyone choking on little felt triangles} :)
Here's how to make your own...

You will need:
8 1/2 x 11 inch piece of felt {I used purple}
green felt
red felt
felt scraps {or an assortment of colored felt}
scissors
sewing machine
needle and black thread
pins

1. Cut out your snakes, I free-handed mine by just cutting a squiggly form then squaring off the head.  If you like do a quick little sketch with a fabric pen, then cut out each snake.  My snakes measure 8 to 9 inches long, with the bodies about 1 inch wide and the head about 1 1/2 inches wide {at the widest point}

2.  Cut a 2 1/2 x 3 inch rectangle of scrap felt to use as a pocket.

3.  Arrange your pocket in the bottom corner of the page {with the widest side at the top, where the opening will be}, pin in place.  Arrange your snakes however you like and pin in place.

4. Cut a small forked tongue for each snake...make it a little longer than you would think, slip the non-forked end under the snake's head and pin in place.

5.  Using coordinating thread, use your machine to carefully stitch around each snake close to the edges.  When stitching the head, stitch over where the tongue is securing it under the head, don't worry too much if it slides a little {it gives each snake a little character if they are not perfectly centered}.  Leave the remainder of the tongue free for a little extra dimension.

6.  Machine stitch around 3 sides of the pocket.  Always be sure to back-stitch when you start and finish stitching to lock your work in place {there are few things worse than falling out stitches}

7.  Using a needle and thread sew two French knot eyes on each snake.

8. Using felt scraps in an assortment of colors cut out small triangles to decorate each snake and store in the pocket. 

****

Page 5: Tropical Fish
Page 6: Coconut Trees


1.23.2013

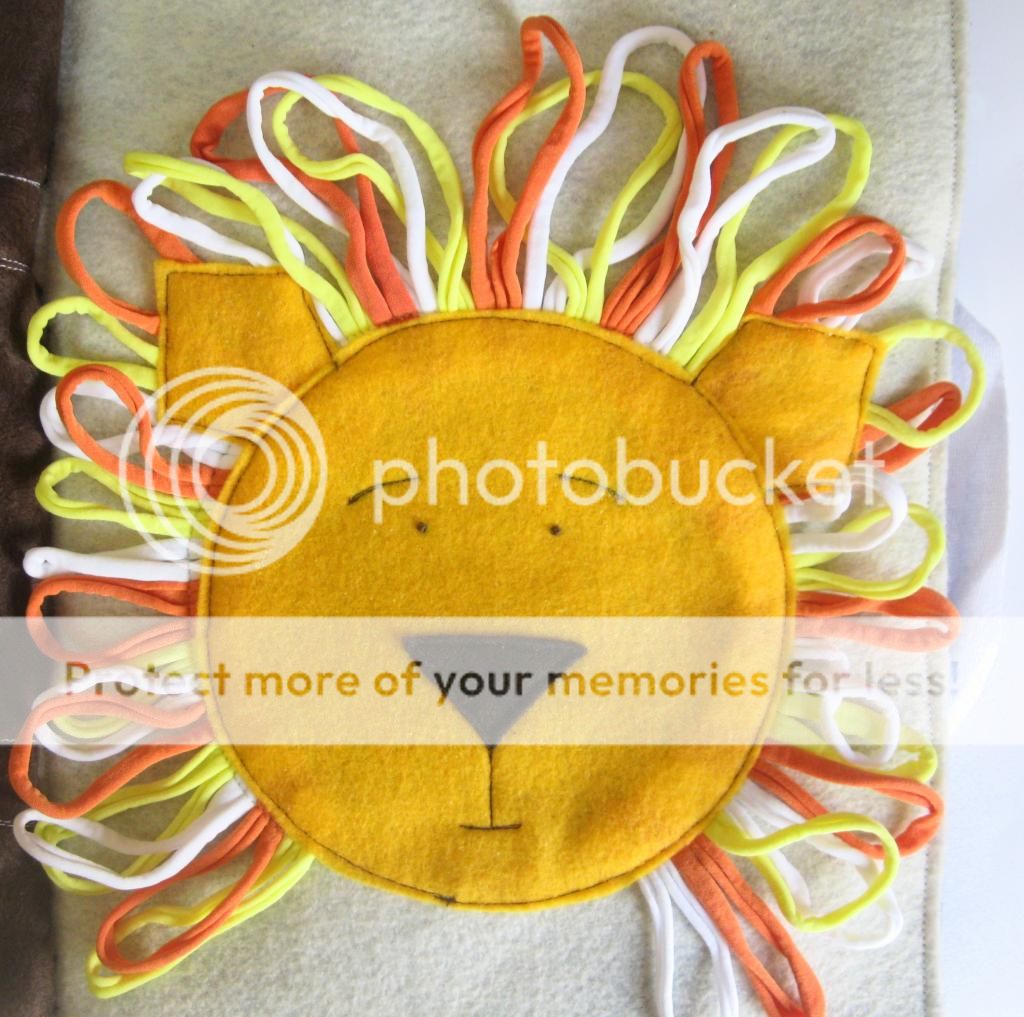
Quiet Book, page 1 {lion}

When I decided to make a quiet book for Oliver {my almost 18 month old}, I knew that I needed to do super easy, uncomplicated pages...otherwise it was never going to be finished {it's been known to happen}.  So I decided on all felt {no hemming and finishing required} and simple designs that could be easily free-handed and didn't require a pattern.

A jungle theme was decided on based on a lion that I saw on Pinterest with a ribbon mane.  But after adding up the cost of all the different ribbons that I would need to created the mane...I decided that I needed to find a new solution.  So wandering through the craft store looking for anything that would work for a mane, I found these...
fabric loops usually used to weave pot holders {remember making those as a kid? I do}.  They work perfect...they stretch and don't unravel...and cost around $3.00 for A LOT more loops than I actually needed {it looks like there is more pot holder making in my future}.

So here's how to make your own quiet book page...

Gather:
1 rectangle of felt {for the background} cut to 8.5 x 11 inches
Golden yellow felt circle measuring about 5 3/4 inches {diameter}
Colorful fabric loops
Triangle of brown felt for nose
Yellow felt ears {what ever size/shape you like}
Embroidery floss and needle
Sewing machine and thread
Fabric marker {water-soluble or disappearing ink}
Scissors
Pins


1. Start by laying out your background piece of felt.  Decide where you want your lion head to be.  You will want it slightly off center towards the bottom of the page to allow room for the mane.  Using a fabric marker draw a 5 inch circle.

2. Start arranging the loops along the drawn line.  If you want the neck to be open start near the bottom of the circle, if not you can start anywhere you like.  Using your sewing machine, stitch along the line, securing the loops.  It's easiest if you arrange the loops a few at a time, then stitch them on.  Repeat until you have a complete mane.

3. Sew another line of stitching inside of your first circle to add extra strength.  Trim the ends of the loops INSIDE the stitched circle, if you like {they will be covered by your lion's head}.

4.  Place the ears over the mane and top-stitch each.  Try to stay close to the edge, and be sure to back-stitch.

5.  Now for the face.  Using the fabric marker, draw the features {eyes, eyebrows, mouth & out-line your nose}.  You can hand stitch or machine stitch, which ever is easiest for you.  I machine stitched the eyebrows and mouth and hand-stitched French knots for the eyes.  After the eyes and mouth are stitched on, top stitch the felt nose on using the sewing machine

6. Place the lion's face over the edges of the mane and ears.  Pin in place.  Using your machine, top stitch close to the edge, completely around the full circle.

And page 1 is done!  Easy, right? :)  
Pages 2-6 coming soon & a binding tutorial to finish it off.

Page 5: Tropical Fish
Page 6: Coconut Trees

12.18.2012

Giving Handmade

This week I am spending finishing up handmade presents for the kids...while they are still in school {and therefore can actually accomplish something...in secret}.  Every year I make something handmade...past years have included quilts,  hand puppets, a rag doll,  a caddy for books to hang on the bunk bed & the list goes on and on.  I almost always wait to long to get started, but I love this tradition.  how much thought, preparation and work goes into each gift.  And that my kids still appreciate it...we are getting nearer to those teenage years after all {12 year old boys are almost impossible to craft for, by the way}

For my youngest I am working on a jungle themed quiet book {he's almost 1 1/2}
...more posts on this later, but here is a hint of what is going to be like, super simple & all felt

My 2nd son {7 yrs} is getting a fort kit, similar to this one .  I love, LOVE that almost everything that I am using I had on hand to reuse or recycle. {a post coming up on this too}

Now, the older two {son, 12 and daughter, 10} are a little more difficult...we'll have to see just exactly what I come up with for them.  I have a few ideas floating around :)

Are you making gifts this year?  If not {and you can somehow find the time this last week before Christmas} give it a try--everyone loves handmade :)